
How to Record a Virtual Conference Talk
Virtual talks have been the bliss and the curse of NLP virtual conferences. Because of the efforts to preserve them and link them up to the paper pages in ACL anthology, they are the bliss for the audience, and greatly improve conference accessibility worldwide. But for the authors they are the curse: because they are pre-recorded, there is an expectation of some degree of polish on the talk, and so the perfectionists may take way more time to prepare and record than just doing the talk live. Also, few of us have a stylish home office to show off, and even fewer majored in film making.
An extra level of complexity is added by the fact that different conferences contract different platforms who host the videos for the duration of the conference, and those platforms may offer more or less convenient recorder software (not to mention the licensing nightmare, which I’ll skip for now). They may also have some format quirks. So far the virtual conferences I attended used either Underline or Slideslive. The former shows regular single-video presentations, while the latter actually has two video streams: the speaker view and the slidesview, the latter usable for navigation.
Each of these platforms has their pros and cons:
- the current slideslive editor lacks basic things like removing, copying and pasting parts of the video. They are going to release a new version soon, which I got to preview, and which is much better - but it is still a browser-based solution, which offers cross-platform accessibility but not well equipped for either video editing or full access to camera/audio settings.
- Underline offers screen-cast-o-matic recorder and editor. The recorder has a desktop “installer”, but seems to be still fundamentally web-based and not giving you much control over the camera & mike. They also do not support Linux.
These, and any other platform-specific setups also have the inherent disadvantage that their full functionality is only available while the conference is paying. Since we have to learn how to use some recording/editing tools - wouldn’t it be better to learn tools we could use at any time (for an invited talk, a lecture, a podcast, etc.)? Also, maybe we could save some money on the services we have to hire, and make conference registrations cheaper?
So… here’s my DYI setup for recording talks that can be then uploaded to single or double-view players (vimeo, slideslive, underline, younameit). It is possible to get a nice recording entirely with open-source software. It’s not harder than an average PyTorch tutorial, and with addition of some commercial software, you can also get the correct captions at the same time.
Step 0: equipment
Minimal setup: you need a camera and a microphone, and obviously a computer where the presentation will run. The built-in webcam and microphone might do, depending on what they are and how picky you are. Your headphones might also have a built-in mike (although I was severely disappointed with my Sony WH-1000XM3).
My fancy setup: I used to be a musician in my previous life, so I’m quite picky about sound. The bottom line with mikes is that you want them to be reasonable quality, in a quiet environment, close to the source of sound (your mouth) and not moving around (as that will create different volume levels). The latter can be achieved either by fixing the mike on yourself (lavalier mikes, headset mikes), or fixing both the mike and yourself (having the mike on the desk or a stand, and not moving).
Caveat: most laptops do not even have a dedicated mike input, even if you have a good mike. In that situation you probably need a USB mike, which essentially works as an external sound card.
In my case, I already was in possession of Zoom H1 recorder which does also work as an external sound card. I could use just the mikes on that recorder, but it also has a separate mike input, which I used for my Røde lavalier Go (which I love dearly).
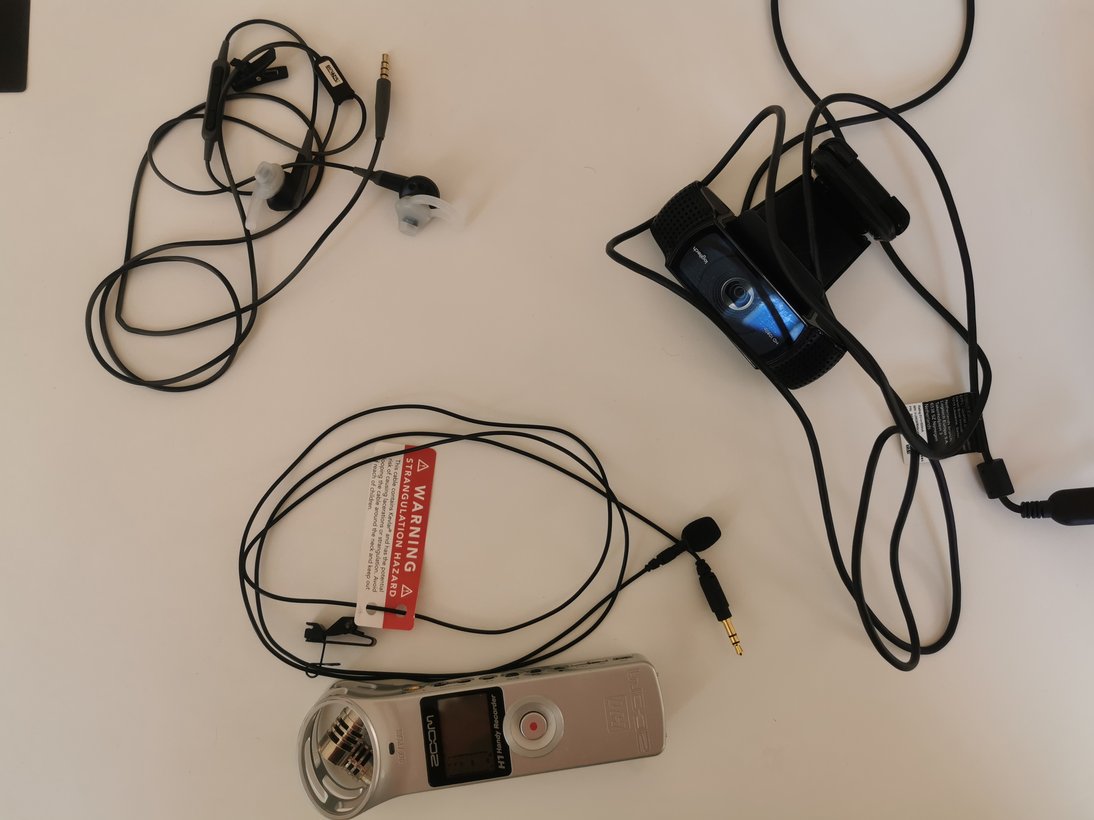
As for the video equipment, I’m really not an expert, but it seems that what matters even more than the camera is the lighting: you need the light on your face to be bright enough and uniform enough, or you’ll get a video that is dark and with unflattering shadows. Depending on your environment, you might be able to just use daylight. The professional setups seem to involve at least two directed lights on both sides of the face.
That is hard on the eyes, so when recording my EACL 2021 tutorial I put the laptop and all the gear on the window sill (with two more windows on either side providing side lighting), so as to face the soft daylight. I had a high-res webcam with autofocus (Logitech HD 1080p), and I thought I could trust it to stay on my face. I was wrong: the light afforded by a cloudy evening in Copenhagen does not suffice. My video ended up quite blurry, and I suspect the autofocus actually made things worse. Proceed with caution.
If you want to remove the background on your speaker view, or replace it with a cool Martian landscape, you will also need something usable as a backdrop: a large piece of solid-colored and smooth fabric (ideally green), and some way to make it hang smoothly behind your chair. Some recorders (such as the one built in Zoom) may have their own filters, which will do a better or worse job of removing your background - but a backdrop will dramatically increase their chances too.
Step 1: Recording
Software you’ll need: OBS Studio (Windows, Linux, Mac)
This is a free, open source, and extremely feature-rich recorder which can do a lot more than we need. I feel quite intimidated by all the settings it has, but luckily we don’t need all of them.
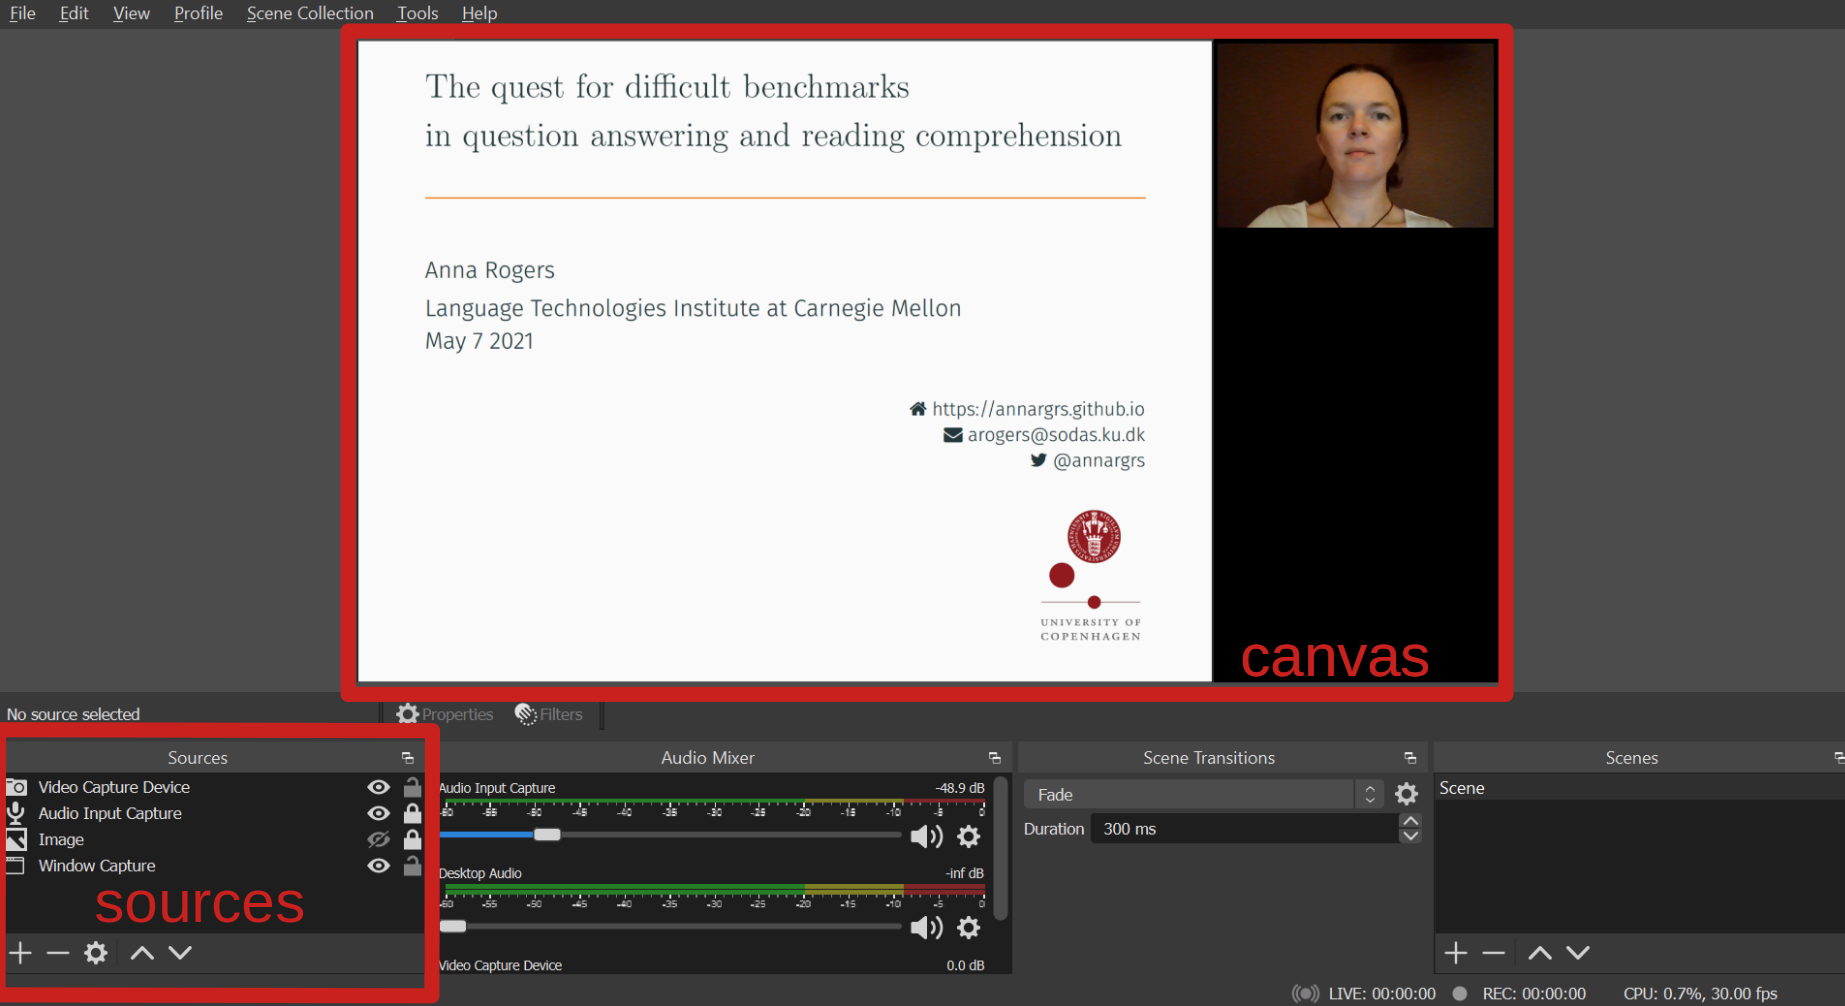
Here’s the OBS interface. We need to understand two sections: canvas and sources:
When you run OBS Studio for the first time, it may ask you whether you want to optimize for streaming or recording (choose recording), and for the video settings. Choose 30 FPS and 1920x1080 resolution, if available.
Single-screen recording
I’m going to assume that the target resolution requested by the hosting platform is fullHD 1920x1080 (if not, adjust the instructions accordingly).
- Go to Settings > Video and set the base canvas resolution to 1920 x 1080.
- In the main window, click on
+button underSources. For a screencast recording you will need at least 2 sources:Audio Input Capture(mike) andWindow Capture(slides). Set your input devices and slides window in the properties for these inputs. - Optional: add the speaker view. The above screenshot shows the speaker view on the side of the slides. To create that, prepare slides that are not 16:9 aspect (mine were 4:3), and then add one more input source:
Video Input Capture(webcam). Place it within the canvas, to the left/right side of your slides view.
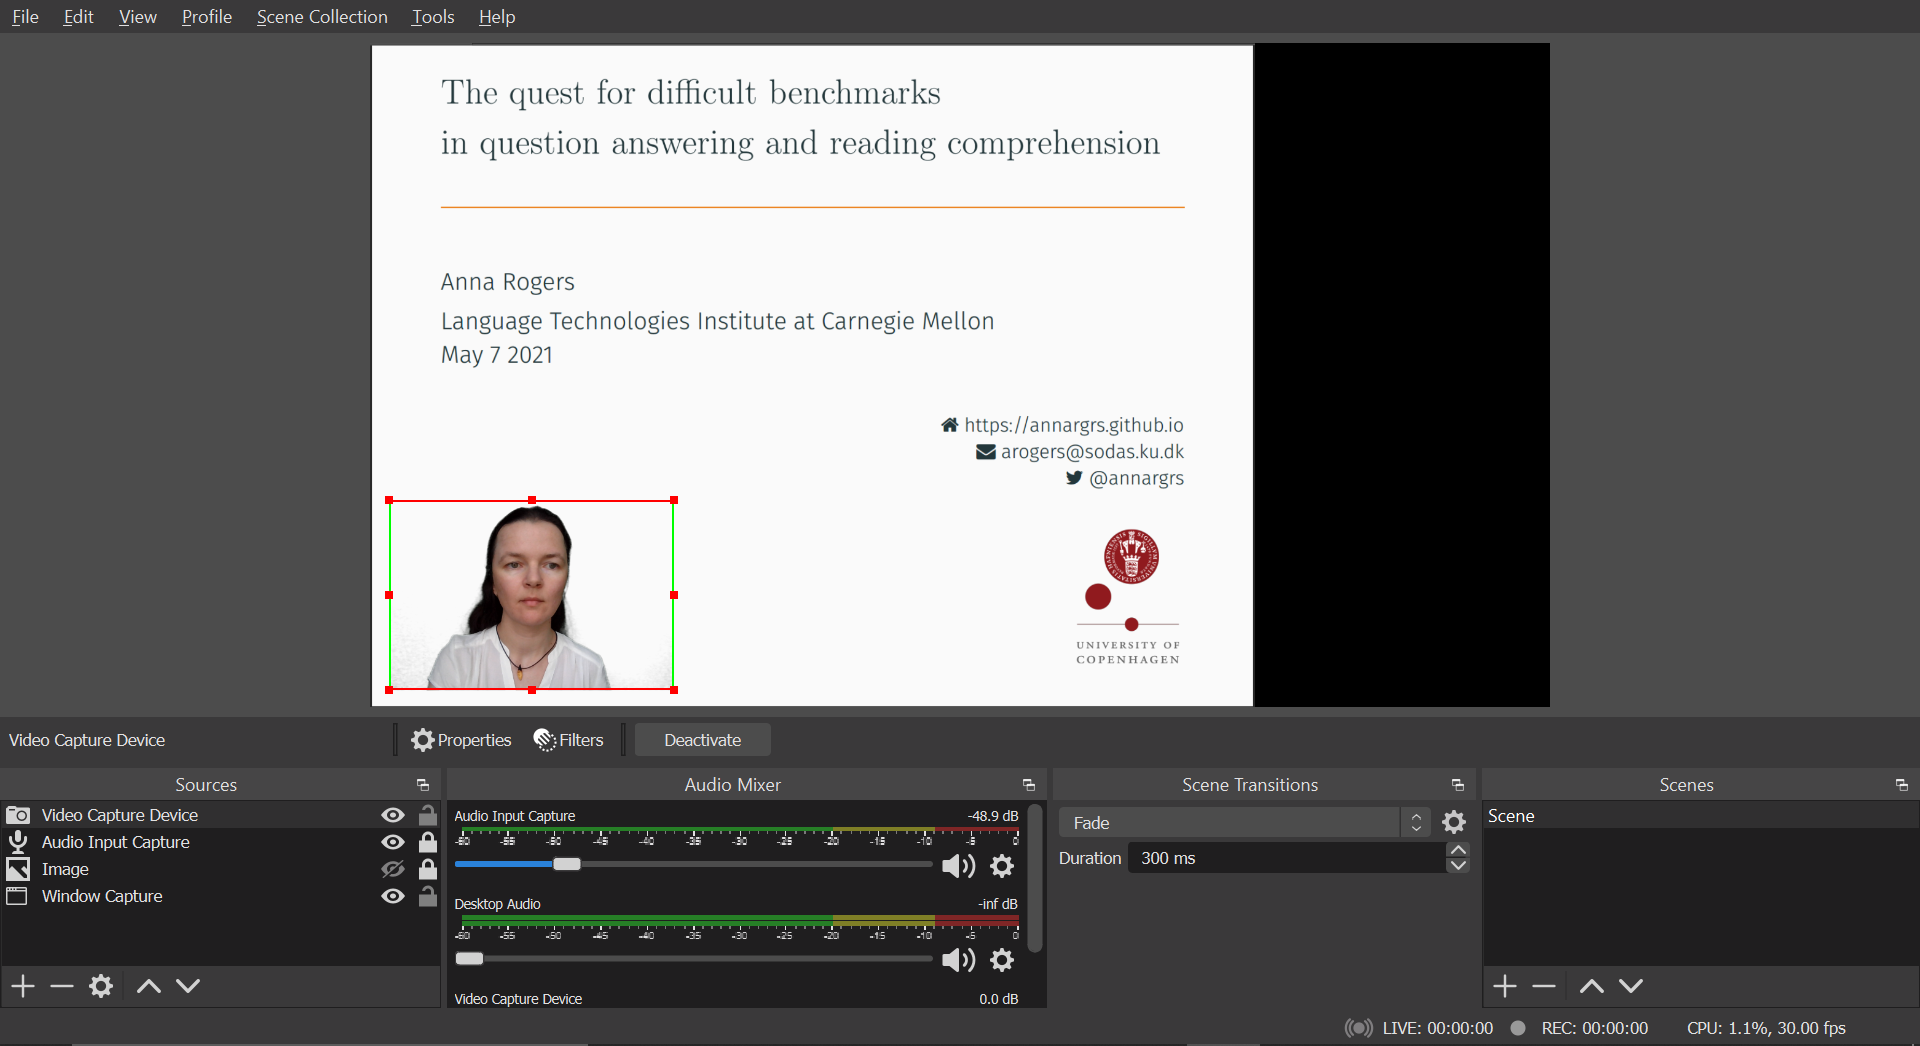
Optional, advanced: Crop the camera view. Most webcams default to 16:9 aspect ratio, and most of us are not bodybuilders and do not need it to be so wide. So we can crop the webcam view to get it closer to portrait aspect, and have a larger view of the face. Select the webcam view on the canvas, go toTransformin its context menu, and experiment with how many pixels you want cropped from any side of the camera view.
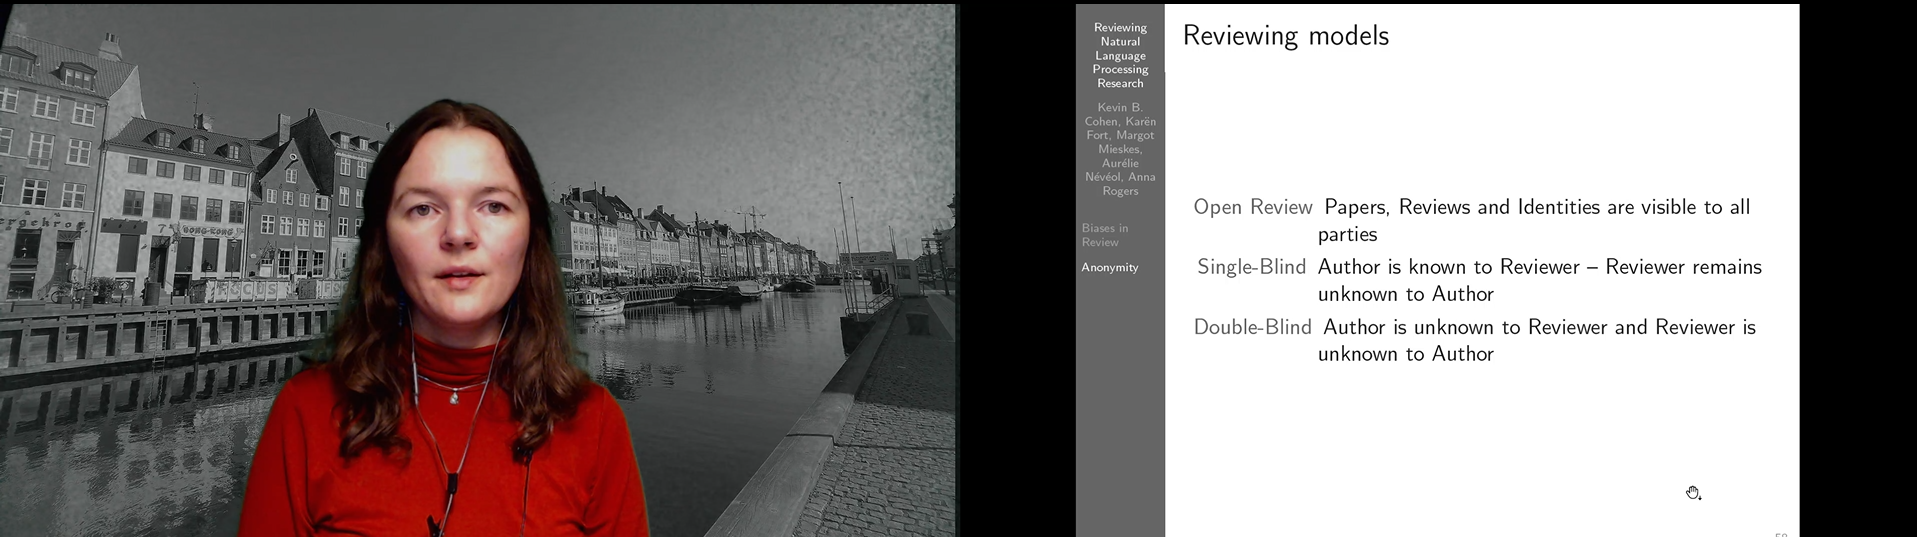
Optional, also advanced: remove the view of your bedroom. If you have something usable as solid color backdrop (ideally green), position it behind you and go to the context menu of the webcam input source. Go to the context menu on the webcam input, findFilters, press the+button in the bottom left corner. Add the filter calledChroma key. In its settings, select the key color type of your backdrop and play with the “similarity” slider until it removes the background and nothing else. Then you can even make the speaker view overlay the slides like this:
Even more advanced: replace the view of your bedroom. You can add a Martian landscape or whatever as your background. Add one more source of the Image type. Choose the image you like in the properties of that source. Position it on the canvas so that it is behind your webcam view (Context menu of the object on the canvas > Order > Move up/down).
- Optional: add any other filters on your sources that you like and know how to use (context menu on an input > Filters > “+” button in the bottom left corner). I always use the
Noise suppressionfilter on the Audio Input (with RNNoise setting): it decreases the background noise caught by the mike from any humming in the room (fridges, computer fans etc.) - Check the
Settings>Hotkeysfor the actions of “recording” and “stop recording”. I have them both atCtrl+R. - Test the whole workflow: start the recording, switch to your slides, do a test slide, stop the recording. OBS Studio simply saves the video file to the location specified in Settings > Output. I save in mp4 format, at “high quality, medium file size” setting.
- Record the talk.
Two-screen recording (for slideslive)
Slideslive is great in giving us the separate views of speakers and slides, but the disadvantage is that, obviously, you have to record two videos instead of one, and keep them in sync. Most recorders can’t do that.
The trick to achieve this in OBS Studio is to record a single ultra-wide video that combines both views, and then to split it into two. So the source video would look like this:
Here’s how to make such a recording:
- Go to Settings > Video and set the base canvas resolution to 3840 x 1080. That will give us room for two 1920x1080 views side-by-side.
- Create speaker and slides views as described above, with any filters you like. Move and resize the webcam view and slides view on the canvas until they are perfectly side-by-side.
- Record the talk as described above.
Step 2: Editing the recording
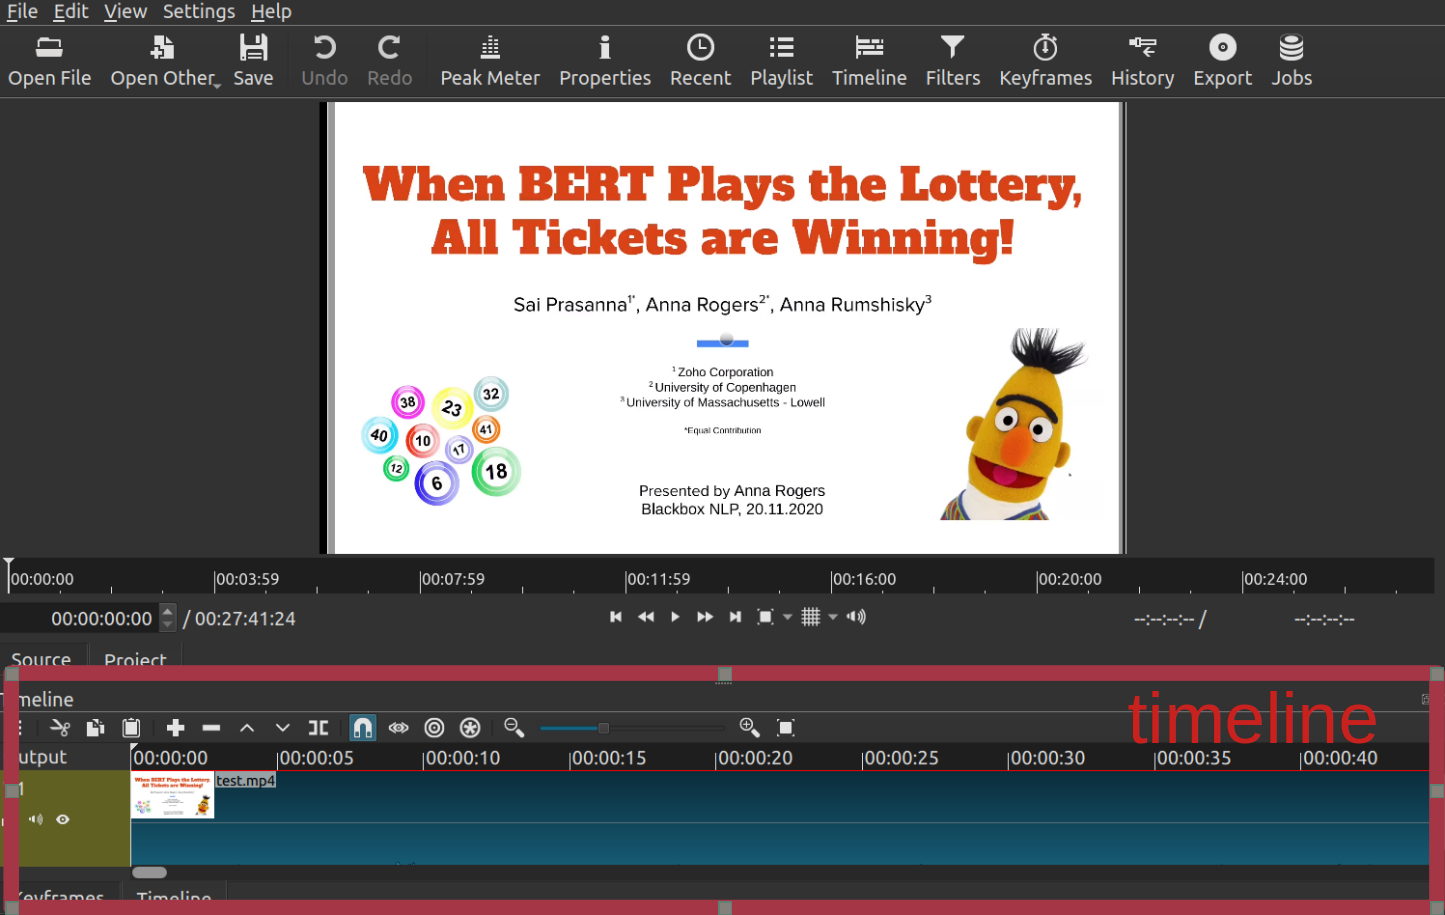
Minimalist setup: All we need is a video editor with three barebone functions: cut, paste, and crop. Shotcut is open-source and cross-platform (Windows, Linux, Mac). Maybe there are even better options (feel free to add suggestions in the comments).
To edit with Shotcut:
- Import your video file (with
Open Filein the panel) and add it to the timeline using the+button. - Do any editing you need, using the timeline for navigation.
Spacewill play the video,Sor the][button will create a split point. If there’s a part of video you’d like to remove, create split points in its beginning and its end and remove it from the context menu on the undesirable part of the video (or use theXshortcut). You can also cut a part of the video this way and paste it to some other split point.
The editor looks like this:
Delux setup. I am absolutely in love with Descript. It is also a video/audio editor, but it is aimed at people producing podcasts and vlogs, i.e. the use case where the primary concern is not just the visuals, but what is being said. Here’s what it looks like:
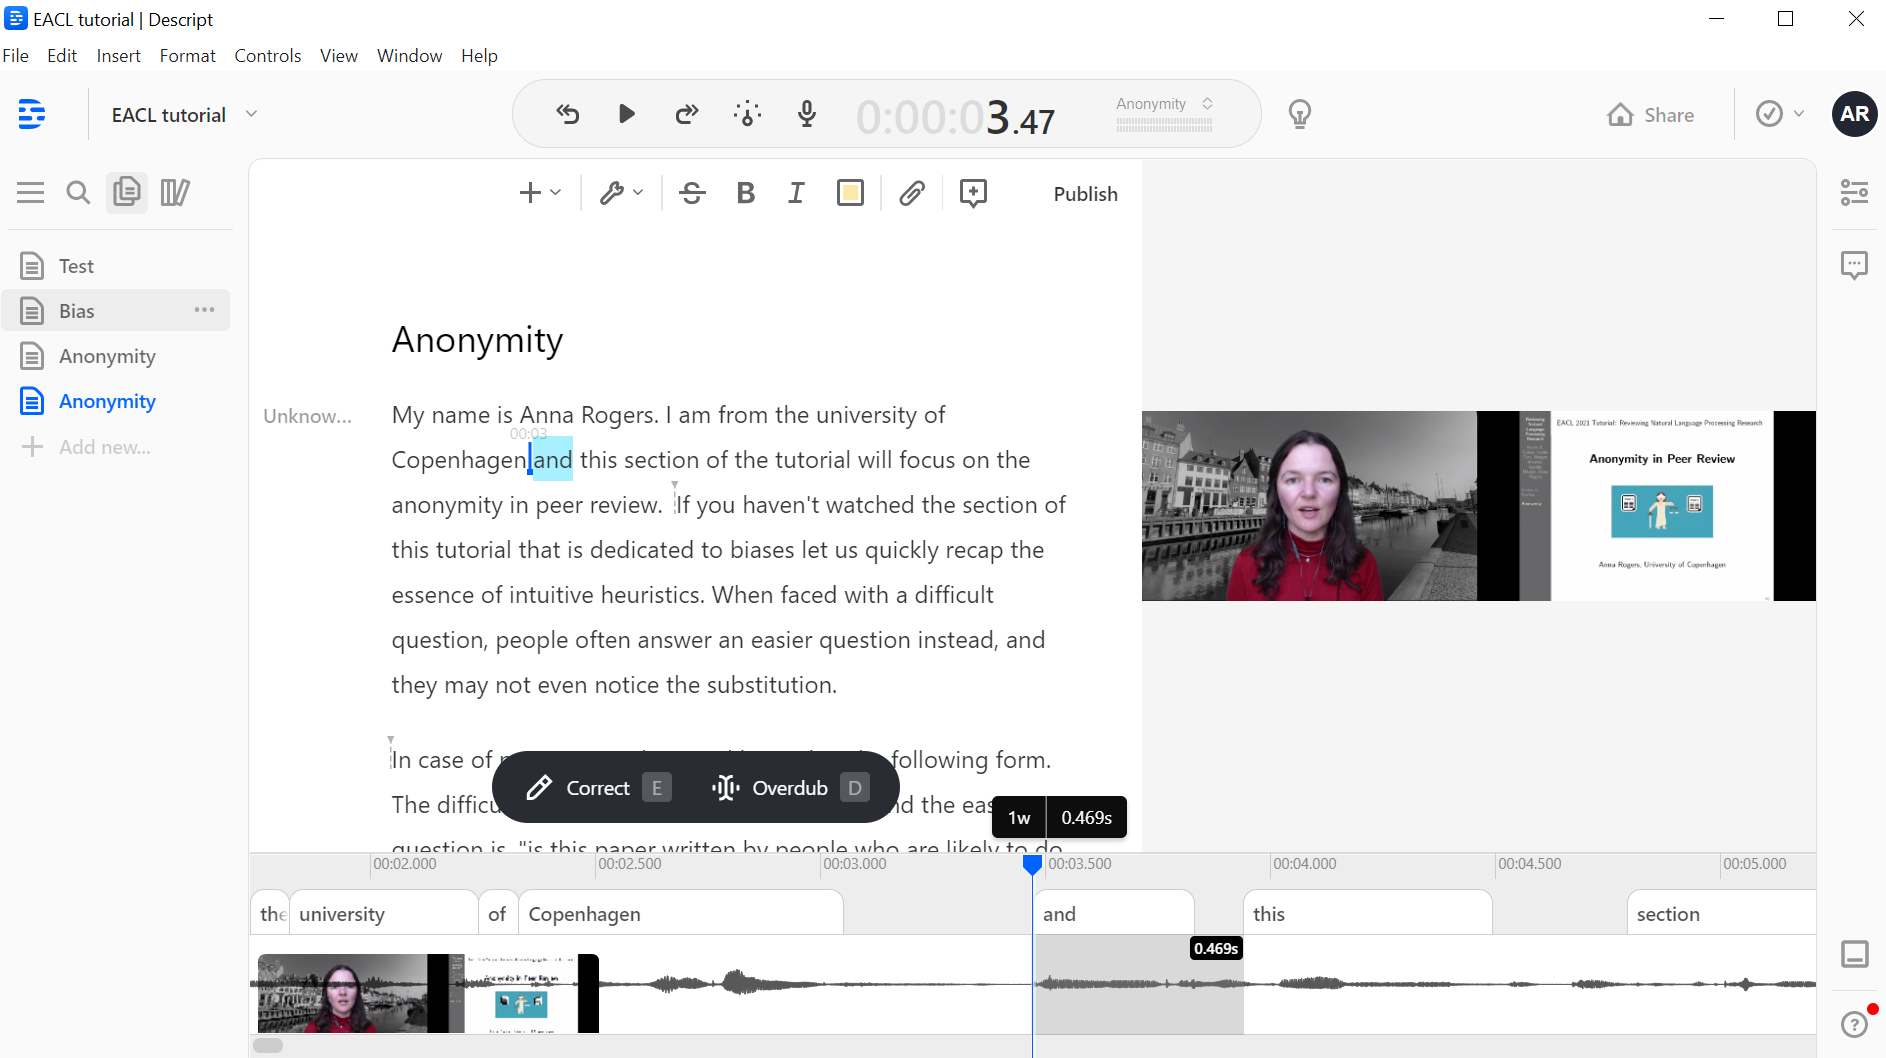
What Descript does is magic. It makes a transcription of the talk, and then lets you edit the video based on that transcript. Which means - no more rewinding several times to try to find the exact moment of the split. This is lightning fast. You read the transcript, you see the part you don’t like, you select the text corresponding to that part and you delete it, just like in a text processor. And the video is adjusted and re-synced automatically. It even has the handy feature of automatically detecting and removing all the “uhs”! And it can normalize the volume of the audio, in case it turned out to be uneven.
The con is that it is not free, but (at least in my case) it definitely saves more time then it costs. The mid-tier version costs $12 a month and lets you transcribe 10 hours of video. The $24 top-tier version gives you 30 hours. There is a free tier with 3 hours of transcription, but it caps the resolution at 720p and adds a watermark.
Also, beware that very fine-grained video editing does make the speaker view video look a bit bumpy. If you try to stitch a sentence together using several separate segments – it will probably look unnatural. I think it is a lesser evil than making people listen to something wrong or full of “uhs”, but a simple strategy to avoid too fine-grained editing is to simply do the tricky part again, without breaking your recording. Let’s say you end up with several consecutive takes of a difficult slide, with various degrees of rambling. When you edit in Descript, you see the text you’re saying, so it’s easy to simply pick the better version and delete the others. The longer segments you get without editing, the more natural the video will look.
If you use Descript:
- Create a project
- Add your video file
- Auto-transcribe it (will take a couple of minutes)
- Edit the text as desired. The deleted parts of video will be auto-removed accordingly.
- Export the video.
Side note: Descript has an interesting security solution. The pro version has the uncanny ability to train a model of your voice, and overdub the parts you wish you said differently (audio only at this point). Which is great for the presenters, but obviously is a security risk, because with enough recordings people could deepfake somebody else’s voice. Well, in Descript they can’t do that: to train the model, you have to record a fairly long specific text, so the victim would have to be tricked into reading it aloud.
Step 3: Splitting the recording (only for slideslive)
However you did the editing, the result is a cleaned-up version of the original video file. If you made an ultra-wide video intended for slideslive, we also need to split it into two files that slideslive can import.
Using Shotcut, add a crop filter:
- click on
Filtersin the top panel - Filter panel will appear on the left. Click
+, open theVideotab, and selectCrop rectangle. - Set the crop filter so as to remove the right part of your video. At this point we have a 3840 x 1080 video, and we need two 1920 x 1080 videos. Set the dimensions of crop for 1920x1080, and the position to 0,0. This will remove the right-hand side of the video.
- Export the edited video (
File > Export Video). - Repeat steps 3 and 4 to export the right-hand side of the video (with the same crop dimensions, but position 1920,0).
Step 4: Subtitles (optional)
Subtitles are a great way to increase accessibility of our videos, but all the specialized terminology + many non-native speakers = captioning disaster. Which is kinda ironic, given that the field is NLP.
The video recording platforms may offer a subtitle editor, but I haven’t seen anyone singing praise for them so far. The ones I tried are lacking in the keyboard navigation, which makes the process slower. Also the process is inherently frustrating, at least for me: by the time we get to subtitles we’ve already spent too much time trying to record and edit the video, and subtitles are the last hurdle that (a) is a lot of work, (b) not fun, because who likes looking at our own very imperfect videos?
It may be possible to do the subtitles elsewhere and then import them to the platform. Slideslive subtitles editor can import subtitles in .vtt format: there is no upload link immediately when you upload the videos, but once they generate their own version of the subtitles, they will send you a link to the subtitle editor. There will be an “import” button there.
If you remember your talk well, the fastest, minimal-effort thing is probably to just download the auto-generated subtitle file from the editor, and do the obvious edits in any text editor. If you need the video to help with the editing, try some other subtitles editor that can work with the given format. A quick search for open-source tools locates Subtitle Edit (Windows, Linux) and its online version that works with local video files.
In my case, I gave up and just paid Descript to be able to edit my video based on text, because then I get exportable transcript/subtitles already as a by-product of video editing. Since the whole editing process is based on text, you can not only remove any bits you don’t like, but also fix any auto-transcription errors as you go. And then you get both the video and the subtitles at the same time! So - full accessibility with as little work as I can imagine.
One slideslive-specific caveat is that the file exported by Descript has extra metadata not conforming to the vtt format (lines 3-5). Once those lines are removed, the subtitles can be imported to slideslive. I was told that the editor will be improved to handle this automatically.
Step 5: That’s it!
Hopefully this worked, and you now have a nice talk recorded in reasonable time. If you have any suggestions for alternatives for the software/hardware I used, or a good lighting solution, or any updates because of changes in any software, please share in the comments!